
Our FAQ is a compilation of the most sought after knowledge on fusing, kilnforming, kilncasting, and working with Bullseye Glass products in general.
General
What is Glass?
Glass shows up just about everywhere. We use it in windows, tableware, containers, jewelry, and of course much more. The most common type of glass — and the type manufactured by Bullseye — is called “soda-lime glass.” Soda-lime refers to the composition of the glass, which is primarily silica, soda (sodium carbonate), and lime (calcium oxide). But for our purposes, glass serves as a unique art-making material.
To learn more, watch our video What is Glass
Is Bullseye glass COE 90?
Unfortunately, the answer to this question is not simple. The intent of most glass fusers who ask this question is to find out if Bullseye glass is compatible with glass made by another manufacturer. But COE (“coefficient of expansion“) by itself cannot tell you if two glasses are compatible. In order to know that a Bullseye glass is compatible with glass from another manufacturer, you must conduct your own tests.
- Matching COEs does not ensure compatibility between glasses, no matter what you read or hear anywhere else. There are many different factors besides COE that determine compatibility between glasses. COE is just a single factor.
- Our fusible glasses are factory-tested for compatibility with each other. We do not test for compatibility with other manufacturers’ glasses. We do not test for COE or rate our glasses with COE numbers. We do not claim to produce glasses that are rated “COE 90.”
- All compatible Bullseye glasses are tested compatible with other Bullseye compatible glass.
We strongly recommend reading TechNote 3: Compatibility of Glasses, which explains this complex and important matter in greater depth.
Can I fuse or cast Bullseye with any COE 90 glass?
The answer to this question is not simple. Our short response is this:
- Matching COEs does not ensure compatibility between glasses, in spite of what you’ve read or heard from other practitioners or glass manufacturers.
- Bullseye’s fusible glasses are factory tested for compatibility with each other. We do not test for compatibility with other manufacturers’ glasses. We do not test for COE or rate our glasses with COE numbers. We do not claim to produce glasses that are rated “COE 90.”
- The ONLY way you can insure that a Bullseye glass will be compatible with another manufacturer’s glass is to conduct your own tests.
- We recommend that you read TechNote 3: Compatibility of Glasses, which explains this complex and important matter in greater depth.
Can I use a ceramic kiln for glass?
Yes, as long as it’s programmable.
Do all Bullseye glasses perform the same in the kiln?
Not all Bullseye glasses behave identically. Slight variations can occur, depending on the viscosities of individual glasses. In About Our Glass, you can find the performance characteristics for all of our glasses by clicking on the individual colors.
What can I expect from Bullseye glass?
Read our full overview of What To Expect From Bullseye Glass.
How big are the individual granules of frit? If applying Bullseye frit with a sifter, what size mesh screen will I need?
Bullseye frit granules come in five sizes: extra large (available in clear only), coarse, medium, fine, and powder. We recommend applying frit with a sifter, as there are a number of interesting effects that can be achieved.
Bullseye extra large frit (-0005):
Grain sizes range from 5.2 – 30mm; granules are retained on a 4-mesh screen.
Bullseye coarse frit (-0003):
Grain sizes range from 2.7 – 5.2mm; granules pass through a 4-mesh screen but are retained on an 8-mesh screen.
Bullseye medium frit (-0002):
Grain sizes range from 1.2 – 2.7mm; granules pass through an 8-mesh screen but are retained on a 16-mesh screen.
Bullseye fine frit (-0001):
Grain sizes range from 0.2 – 1.2mm; granules pass through a 16-mesh screen but are retained on an 80-mesh screen.
Bullseye powder frit (-0008):
Grain sizes are 0.2mm and finer; granules pass through an 80-mesh screen.
How can I learn to cut glass?
If you’ve never cut glass before, it’s a good idea to take a class and learn the fundamentals. You can easily tell a person how to run a score line and break a piece of glass along a fissure, but it’s a skill that takes practice. Your instructor should show you the best tools and techniques to use and you’ll get a chance to get a feel for it before investing in glass and equipment of your own.
We also have a free Glass Cutting video lesson.
How do Bullseye colors look after firing?
Many of our glasses look the same before and after firing, but some will mature or “strike” to target color during the firing process. The images of fusible glasses in our online store show how colors appear before and after heatwork. If you study these images and still have questions, don’t hesitate to contact our Sales Associates (Monday-Friday, 7-5 PST; 503.232.8887; or send us an email).
Note: If you plan to subject glass to repeated firing or exceptional heatwork, we recommend that you test samples of the glass to the required processes and firing cycles to most accurately predict color outcomes.
Is Bullseye glass compatible in all conditions?
When kilnforming, there are a multitude of variables to keep in mind. If you plan to subject Bullseye glass to unusual working conditions, we always recommend conducting your own tests.
Under normal working conditions, Bullseye glasses are known for reliable compatibility. Each batch of glass we produce in our factory is tested by firing to 1500 degrees Fahrenheit followed by a fifteen minute anneal soak; the batch is then checked for stress through polarized light. If a given batch doesn’t meet our standards of compatibility, we won’t label it as such.
Up to 1500 degrees Fahrenheit and followed with a fifteen minute anneal soak, Bullseye glasses can be expected to remain stable. If you plan on using a heat process with an extremely high temperature or unusually long firing time, we recommend conducting your own tests beforehand.
Also, be aware that if you use flameworked elements, those elements may have been heated beyond 1500 degrees Fahrenheit. Those elements should also be tested separately beforehand.
For more information, please read What to Expect from Bullseye Glass.
Is all Bullseye glass recommended for fusing?
Our top-quality sheet glass comes in two grades: Fusible and Standard (non-fusible). Fusible glass is coded as “F” and Standard or non-fusible glass is coded as “P.”
- “Fusible” glasses pass factory testing for color and fusing compatibility. They carry the “Bullseye Compatible” label and are recommended for kilnwork and flamework, as well as cold applications.
- “Standard” glasses pass factory testing for color, but are not designed for fusing. They are recommended for cold applications such as stained glass, mosaic, copper foil, and leaded work.
We also offer two grades of Curious-quality glass: Fusible-Curious and Curious. Fusible-Curious glass is graded “B”. Its color or appearance fall outside of our target range, but it is still recommended for kilnwork, flamework, stained glass or mosaic. Non-fusible Curious is graded “C”. It falls outside our accepted color or appearance range and is not recommended for kilnwork but is still good for stained glass or mosaic use.
To learn more about our coding/grading system, please read our Glass Coding PDF.
Also, be sure to read our notes on What to Expect from Bullseye Glass.
Is Bullseye glass food safe?
Listed below are the Bullseye glasses that contain more than 1.0% lead or more than 0.5% cadmium. If you use any of these styles for food-bearing objects, we recommend capping them with Bullseye Clear Glass. In our testing, we have found that clear-capping results in minimal lead and cadmium leaching — well below FDA limits. In our testing, we have also found that transparent glasses leach lead/cadmium at levels below FDA limits, and much less than opalescent lead/cadmium-bearing glasses; so you may be able to use transparent lead/cadmium-bearing glasses without clear-capping.
Our testing, however, does not cover all glass styles or firing conditions, and it cannot be taken as a guarantee of food safety when using these glasses. If you sell food-bearing objects, it is your responsibility to have them tested, since lead/cadmium leaching can be affected by the specific processes to which the glass is subjected. A heavily textured surface, for example, has more total surface area and, therefore, more area from which lead/cadmium may be leached.
A local chemistry lab should be able to perform the necessary test for you, according to ASTM C738-94(2006) Standard Test Method for Lead and Cadmium Extracted from Glazed Ceramic Surfaces, for a relatively low fee of around $30 to $70 dollars per sample.
The following glasses contain more than 1.0% Lead (Pb)
Opalescent
- Cobalt Blue Opaque Rod 000014
- Translucent White 000243*
- Pink 000301
- Lavender 000304
- Dusty Lilac 000303
- Salmon Pink 000305
- Dense White 000313
- Plum 000332
- Gold Purple 000334
*Note on Translucent White: Glass in this style produced prior to 4/29/16 contains lead. Production from 04/15/21 also contains lead.
Transparent
- Light Coral 001205
- Light Pink 001215
- Light Fuchsia 001232
- Violet 001234
- Cranberry Pink 001311
- Sunset Coral 001305
- Fuchsia 001332
- Gold Purple 001334
- Cranberry Sapphirine 001342
- Amber Lustre 001701
- Green Lustre 001707
- Blue Lustre 001714
- Copper Green Lustre 001717
- Burnt Scarlet Tint 001823
- Ruby Red Tint 001824
- Ruby Pink Tint 001831
Streaky
- White, Pink Opal 002302
- White, Salmon Pink Opal 002305
- White, Cranberry Pink 002310
- Cranberry Pink, White 002311
- Petrified Wood, 002971
- Cranberry Pink, Royal Blue, Spring Green, White 003026
- Azure Blue Opal, Jade Green Opal, Neo-Lavender 003045
- Cranberry Pink, Royal Blue, Spring Green 003126
- White, Deep Royal Purple, Cranberry Pink 003328
- Cranberry Pink, Gold Purple, White 003334
- Cranberry Pink, Emerald Green, White 003345
- Cranberry Pink, Azure Blue, White 003346
Ring Mottles
- Lemon Yellow, White, Gold Pink 006323
- White, Olive Green, Gold Pink 006343
- White, Lime Green, Turquoise, Gold Pink 006467
- White, Turquoise, Lime Green, Gold Pink 006446
- White, Gold Pink 006210
- White, Turquoise, Gold Purple 006336
The following glasses contain more than 0.5% Cadmium (Cd)
Opalescent
- Tomato Red 000024
- Tangerine Orange 000025
- Canary Yellow 000120
- Red 000124
- Orange 000125
- Spring Green 000126
- Woodland Brown 000203
- Sunflower Yellow 000220
- Deep Red 000224
- Pimento Red 000225
- Golden Green 000227
- Cinnabar 000309
- Umber 000310
- Marigold Yellow 000320
- Pumpkin Orange 000321
- Burnt Orange 000329
- Butterscotch 000337
Transparent
- Sienna 001119
- Yellow 001120
- Red 001122
- Orange 001125
- Chartreuse 001126
- Marigold Yellow 001320
- Carnelian 001321
- Garnet Red 001322
- Red-Orange 001022 (Rod)
- Light Orange 001025 (Rod)
Streaky
- Clear, Sunflower Yellow Opal 002020
- Yellow, Deep Forest Green 002121
- Clear, Red Opal 002024
- Clear, Spring Green Opal 002026
- White, Orange Opal 002123
- Red Opal, White 002124
- Yellow, Red 002125
- White, Orange Opal, Deep Forest Green 003123
- Woodland Brown Opal, Ivory, Black 003203
Some of our Collage sheet glass styles include streamers made with styles in the cadmium lists above.
(Updated August 2021)
What are “striking” glass colors?
Some Bullseye glasses appear pale or colorless in the cold sheet form, but “strike” or mature to a much different color when fired. Striking colors can vary, depending on temperature, atmosphere, and heat history.
Producing strikers allows for a greater palette of colors for kilnworkers. And because heat work is cumulative, we use the minimum amount so that kilnworkers can use more of it in their studios.
For projects that are especially color-sensitive, we recommend testing your striking glasses prior to use either by fusing or torch working small samples. This will help you predict final color results.
Our video lesson Heatwork and Color covers the topic of striking glasses. You can also learn more in our article What to Expect from Bullseye Glass.
What should I know about studio safety?
Here are are some general guidelines to avoid injury while working in the kiln-glass studio. For more information, see Safety in the Kiln-Glass Studio.
When working in a kiln-glass studio, cuts will happen, but they are usually not deep. You will want to have a first aid kit on hand with a supply of Band-Aids.
A greater safety concern in a kiln-glass studio is particulate in the air. For example, dusts and powders. You will want to make sure your studio is well-ventilated and that you wear a suitable respirator.
Also, be sure to read the owner’s manual for any piece of equipment you plan on using while working. Don’t assume you know how to work with one type of equipment because you’ve worked with something similar before. Always read the instructions and, if possible, take a class or workshop in your area to get practice.
What’s the specific gravity of Bullseye?
The specific gravity of Bullseye glass is 2.5.
What is Bullseye’s glass coding system?
Download the Bullseye Glass Coding System PDF
What is The Rule of Halves?
This rule is important to know for successful glass cutting. A score is more likely to run properly when there are equal amounts of glass on either side of it. This is particularly important for cutting strips of glass.
What are Curious glasses?
The grading system for our handmade glass demands that each sheet match a target color and have a uniform appearance to receive first-quality grade. Glass that is not quite the target color or that has some other irregularity is graded “Curious” and is sold at a discount. Curious glass that is fusible is graded “Fusible-Curious” and is also sold at a discount. Fusible-Curious sheets are held to the same compatibility requirements as first-quality sheets. Our Curious and Fusible-Curious sheets are excellent for one-of-a-kind projects and are a great value for your dollar. Some of these sheets may be found in the Limited section of our online store.
A much wider selection is available when you order by phone or email or when you shop at our Resource Center and some regional dealerships.
What are Special Production glasses?
Occasionally we produce limited runs of top grade glass styles that are not included in our regular product line. We refer to these as “Special Production” sheets. Special Production sheets may be one-of-a-kind or available in multiples. They may be fusible or non-fusible. Some Special Production sheets may be found in the Limited section of our online store. Often, a wider selection is available when you order by phone or email or when you shop at our Resource Center and some regional dealerships.
Want to know about our newest special production sheets as they become available? Sign up for our mailing list, or check back with our online store frequently.
How do I know which Bullseye clear glass to use?
Tekta is Bullseye’s signature style of clear glass.
Bullseye manufactures two styles of its Tekta glass: Tekta Clear and Tekta Crystal Clear. Tekta Crystal Clear is recommended for crystal clarity, especially in thicker works. Compare styles and sizes of our clear glasses here.
Is there bubble-free glass?
Bubbles are found in all handcrafted glasses. They contribute to the art and beauty of finished glasswork. You can learn to minimize bubble formation or to create bubble patterns and effects by reading TechNotes 5: Volume & Bubble Control.
Is it safe to fire Bullseye Glass in a kiln?
Yes. At cold temperatures and typical firing temperatures, the colorants are encapsulated in the glass and the glass does not emit odors or toxics into the air.
However, ventilation is recommended to dissipate odors from shelf separators or vapors from certain non-glass materials applied to the surface of the glass and fired.
Your safety is important to us. Here are some links to articles about safety in the kiln glass studio:
Is Bullseye glass microwave/dishwasher safe?
To keep it looking great for years to come, we recommend treating your fused glass artwork the way you would fine china or crystal: Keep it out of the microwave and dishwasher.
Microwaves can heat unevenly and this, in turn, can lead to cracked glass due to thermal shock. (We’ve had plates crack in the microwave at the Bullseye factory.) Time, temperature and even the food being cooked play a part in safe heating. Heating slowly or on lower power settings may allow you to avoid thermal shocking glass.
Dishwashers can etch glass over time, resulting in scratched and cloudy glassware.
Why should I choose Bullseye glass over other glasses?
When you buy Bullseye glass, you’re investing in top-quality materials and technical resources:
- Our standards for testing and quality are the highest in the industry and our products are unsurpassed for consistency and reliability in performance. Our product dependability conserves your valuable time and resources.
- Our glass products are developed in collaboration with artists from around the globe. We offer artists the largest and most subtle palette of compatible products on the market, with more than 1,150 styles and forms of glass.
- We are the only glass company with full-time kilnforming and torchworking staff to serve you by addressing technical problems, developing first-rate educational resources, and researching new products and glassmaking techniques.
- Our glass-savvy sales team provides responsive, individualized service.
- We monitor our manufacturing practices continually to surpass best practices for employee safety and environmental accountability.
- All our glass is made in the USA.
New to using Bullseye Glass?
“Your choice of glass is probably the most important decision you will make as a kilnformer.”
– Artist Steve Immerman on why he exclusively uses Bullseye.
Bullseye glass is developed by artists, for artists. We’ve got your back!
A GLASS FOR ALL REASONS
40 years of continuing research on glass formulation makes Bullseye glass ideal for kilncasting, torchworking, kilnforming, fusing, slumping and stained glass.
DO YOU LOVE COLOR?
Bullseye delivers more colors than anyone, in a palette designed to meet your needs. The possibilities are almost limitless: use Bullseye colors as they’re made, or layer them to create thousands of additional colors.
Forms and Selection
Nearly every Bullseye color is available in both 3 mm sheets and Thin 2 mm sheets. Plus we offer iridescent coatings in both 3mm and 2 mm transparent colors. We also offer frit in nearly every color, and a variety of accessory glasses including stringer, rods, ribbon, confetti, billets, and more, in many colors.
Superior Performance Under Kiln Conditions
- Bullseye glass is tested to perform reliably through three firings. Bullseye glass can be pushed well beyond its stated temperature range with minimal problems.
- The texture of Bullseye glass helps in reducing trapped air between layers. The result: Fewer and more attractive bubbles when firing two or more layers.
- Consistent thickness from edge to edge. Fusing is all about volume control, and sheet glass that varies in thickness can cause problems.
Trusted Technical Support
Bullseye’s technical support is unrivaled. This includes scores of free online articles on technique and projects, more than 100 online video lessons (some free, some by subscription), and we host and moderate a growing group of makers of all levels in the Bullseye Glass Community on Facebook.
Environmental Care
Bullseye Glass is made only in Portland, Oregon, with a more extensive emission control system than any other glass factory in North America. We comply with all federal and state safety regulations for the protection of our workers and our community.
Explore the Possibilities
Signup for our Newsletter
Ready to get started with Bullseye? Signup for our newsletter for product information and project ideas, and to hear about sales and special events in your area.
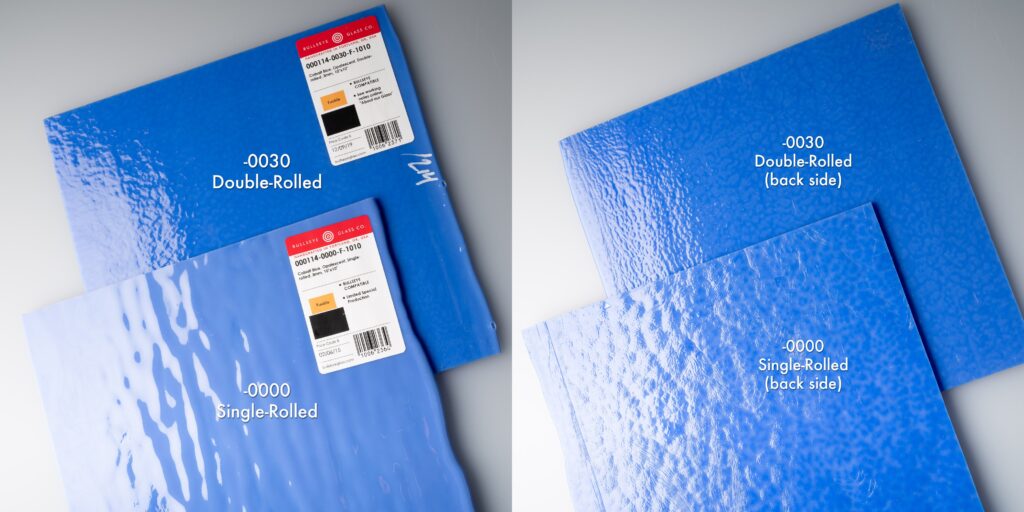
What is the difference between single-rolled and double-rolled sheet glass?
As you might guess based on their names, the difference between single-rolled and double-rolled sheet glass has to do with how each kind of sheet is made.
Bullseye operates two types of rolling tables. The single-roller consists of a water-cooled steel table and a single roller. A caster spreads a dollop of molten glass across the table and guides it under the roller to insure even coverage. A single-roller allows Bullseye to make collage glasses like fracture-streamers, stringer glasses, etc. In that process, chips and/or threads of glass are first arranged on the table and then the sheet is rolled over them, picking them up to form completely unique patterns in the finished sheet.
On the second style of table, the double-roller, the glass is pressed between a pair of rollers, creating a sheet with more uniform top and bottom surfaces. In the image above, you can compare the visual and textural qualities of the single and double-rolled sheets. That is the difference! And it occurs because of the different ways they’re made, or, more specifically, because of the different kind of tables they’re rolled on.
Kilnforming
What is kilnforming?
Kilnforming is the process of shaping glass in a kiln with heat and gravity. There are many methods and techniques that are related to kilnforming, including glass fusing, glass slumping, kilncasting, and printmaking.
There is a type of glass called “kiln-glass” that’s specifically manufactured for use in a kiln. One of the properties of this glass is “compatibility”, which allows it to be fused to another disparate piece of glass in a kiln.
When glass is heated in kiln, it becomes soft and the consistency becomes sticky and almost honey-like. As the temperature continues to increase, the glass becomes more liquid. Gravity takes hold of the molten glass, the molten glass fills the space in which it’s contained, and fuses with any other pieces of compatible glass.
When the temperature inside the kiln is returned to room temperature (after an appropriate anneal soak phase), the glass will resume its crystalline structure in the shape it assumed at process temperature.
What is fusing?
Fusing is the technique of joining two or more pieces of glass by heat in a kiln. There are different glass fusing techniques. For example, “tack fusing” is a fusing technique in which the pieces of glass are heated until they are just hot enough to stick together and retain many of their own original characteristics. In a full fuse, on the other hand, glass is heated until it becomes molten.
Fusing requires a special type of glass. Specifically, the different glasses you use must all be compatible with each other. We recommend using Bullseye kiln-glass for fusing projects because we test and label all of the glass we manufacture for compatibility. When using one or more different types of glass, you’ll need to perform your own tests for compatability.
Many people use the terms “fusing” and “kilnforming” interchangeably; however, that is not entirely correct as fusing is one of many kilnforming methods. People also tend to use “kiln-glass” and “fused glass” interchangeably, though we prefer to reserve “fused glass” for finished projects that have already been fired in a kiln and fused with another piece of glass. Fused glass art can be any number of things: from slumped bowls and platters, to printed imagery, to anything else the mind can conceive and make.
At Bullseye, we manufacture a variety of kiln-glasses that can be used for fusing. This also includes accessory glasses like frit, powder, rod, and stringer.
For more information on glass fusing and fused glass, be sure to watch our video lesson: Fusing Basics.
Don’t forget to browse fusible-grade Bullseye Glass at the Bullseye Online Store.
What temperature should I use for fusing?
Since temperatures and firing schedules can vary depending on the project you’re making, there’s no single answer to this question.
We do offer suggested firing schedules for specific projects on many of the articles and projects on our Index of Articles page. These work well if you know what you want to make.
In TechNote 4: Heat & Glass, you’ll find basic principles for fusing glass. Many of our video lessons also cover fusing.
The important thing to know is that there are a few considerations to make before deciding on a fusing schedule. Rather than suggesting schedules, it’s more productive to learn the science behind what’s happening in the kiln, how a certain glass reacts at a given temperature, and how heat is transmitted throughout your kiln.
What is tack-fusing?
Tack-fusing is kilnforming technique wherein two disparate pieces of glass are heated until they’re just hot enough to stick together, but not so hot that they lose their individual characteritics or fuse flat.
What temperature should I use for tack-fusing?
A tack-fuse is a “lighter” fuse than a full fuse. Tack-fusing is a kilnforming technique used when you want to join two or more separate pieces of glass together, but also retain their individual characteristics.
Tack-fusing temperatures are lower than full fusing temperatures, but there are still many variables to consider and there isn’t one “tack-fusing temperature” that can be used in all cases. By reading Technote 4: Heat & Glass, you can learn basic principles for tack-fusing glass.
What is slumping?
Slumping is a kilnforming process that uses heat and gravity to transform sheet glass into the shape of a mold. One can to create an almost endless variety of forms when slumping glass.
When the glass is heated in a kiln and enters a liquid state, the force of gravity pulls it to the floor. In glass slumping, this “floor” is some type of mold.
After the heated glass has flowed into the mold and assumed its shape, it is cooled back down to room temperature with an appropriate annealing phase. By the time the glass is fully returned to room temperature the liquid glass will be crystallized into the rigid form of glass with which we are most familiar. Its new permanent shape will be that of the mold.
Slumping is a process that is commonly used to make food-bearing objects such as bowls and platters, but with some creativity one can create all kinds of interesting variations.
What temperature should I use for slumping?
Glass slumping is a fun and rewarding kilnforming technique used to make bowls, platters, plates and many other objects. Slumping projects will usually require relatively low temperatures and longer hold times in the kiln than many other types of kilnforming projects. The idea is to allow the glass to soften, then gently sink, or slump, into the mold.
There is no “one-size-fits-all” slumping temperature. The temperature and firing schedule you use will be determined by the shape of the project and specific materials you’re using. We do have information available on various projects on our Index of Articles page. Tipsheet 7: Platemaking Tips contains firing schedules for projects like plates and platters. TechNote 4: Heat & Glass covers basic principles for slumping glass, and if you haven’t yet, be sure to watch our video lesson Slumping Basics.
Ready to get started? Bullseye also offers a variety of high quality slumping molds.
How do I use Bullseye slumping molds?
You can start by reading Tips for Using Bullseye Slumping Molds. We also have suggested firing schedules for the slumping molds we carry in both Fahrenheit and Celsius. Since different molds require different firing schedules, you’ll have to experiment, ask questions, and gain hands-on experience to become an expert in planning the heatwork.
Note: The measurements stated for molds in the Bullseye Catalog and in our Online Store are of the outer dimensions of the mold. This is to help you determine whether a given mold will fit in your kiln. Molds are handmade, so slight variations in size are to be expected. Individual molds will vary—never cut glass to fit until you have measured your mold.
Why should I fuse and slump glass in separate firings?
Fusing and slumping are two unique processes, requiring their own unique firing schedules to get right. It’s not possible to conduct these processes simultaneously. A firing schedule designed with the objective of fusing and slumping at the same time will not effectively accomplish either.
Full fusing temperatures are much higher than slumping temperatures. If you were to try to fuse and slump simultaneously by firing to full fuse temperatures, you would end up with a misshapen piece of glass with large air bubbles. The glass would also likely stick to the mold.
Fusing before slumping allows you to avoid potential problems with air bubbles, while also exercising greater control over the final outcome of the piece.
To learn more about firing schedules for fusing and slumping, see TechNote 4: Heat & Glass and TipSheet 7: Platemaking Tips.
How and why should I clean glass before firing it?
Glass should always be cleaned before it is fired in a kiln. Cleaning glass removes problem-causing contaminants like glass-cutting fluid, oils, minerals, salts, dusts, fibers, sticker residues, pen marks, and fingerprints. These contaminants may be visible in the finished glass and may even cause devitrification, the growth of crystalline structures on the glass, if they are not removed from the glass before firing.
Do not use a cleaning agent that contains detergent, as they can cause an ion exchange on the surface of the glass that can lead to a process called “weathering”. Also, do not use a cleaning agent that contains ammonia or denatured alcohol, as these can leave behind residues that cause devit. We recommend a product called Spartan Glass Cleaner, a mixture of water, isopropyl alcohol and acetic acid.
To learn more about cleaning recommended cleaning supplies and practices, please read our short article Glass Cleaning Basics or watch our free video lesson on Glass Cleaning.
How do I prevent glass from sticking to kiln shelves?
Hot glass will adhere to kiln shelves if not prevented by a separator. For most basic kilnforming projects, Bullseye Shelf Primer is an ideal separator. It’s affordable, highly effective, and easy to use.
See Using Bullseye Shelf Primer for instructions.
For some projects, you may wish to use ThinFire Shelf Paper or Fiber Paper. To learn about using ThinFire, you can read our Instructions for Using ThinFire Shelf Paper. To learn about using Fiber Paper, see TipSheet 3: Working Deep and TipSheet 5: Bullseye Box Casting.
Many of our video lessons also demonstrate how to use shelf separators.
What is devitrification or devit?
Devitrification (“devit”) is the growth of crystalline structures within or on the surface of glass. (“Vitri” = glass; “devitrification” = the process of becoming un-glasslike). Devit can result from firing too slowly through the devitrification range of temperatures. It can also result from firing contaminants like oils and fingerprints onto glass and thus seeding the growth of crystals.
To learn about how to fire safely through the devitrification range of temperatures, see TechNote 4: Heat & Glass. To learn about removing surface contaminants from glass before firing, see Glass Cleaning Basics.
Besides sandblasting, how can I remove devit?
If your glass is flat, you can sift a very thin layer of Clear powder (about 2 grains thick) over the entire piece and fire it to 1425°F (774°C) – 1450°F (788°C) for about ten minutes, depending on your kiln. This should remove the visible presence of devitrification. Please note: This method only works if you don’t intend to fire the piece again, as refiring could restart the crystallization.
What is firepolishing?
Firepolishing is the process of heating a glass object in a kiln to a temperature high enough to impart some level of gloss to the surface.
What temperature should I use for firepolishing?
Firepolishing is the process of heating a glass object in a kiln to a temperature high enough to impart some level of gloss to the surface.
Firepolishing can happen anywhere from 1100°F (593°C) – 1480°F (804°C), and temperature depends upon factors such as glass color, rate of heat, and the degree to which the surface has been coldworked. Firepolishing can also be achieved during a slump. As with all heatwork, it is cumulative.
What is annealing? Why is it necessary?
One of the most distinctive physical properties of glass is how it reacts to temperature variation. When it heats, it expands; and as it cools, it contracts. These processes create stresses within the glass, especially between the interior and the surface where the widest temperature variations can be found.
To relieve stresses, which can lead to breakage at room temperature, it is necessary to cool glass in a controlled manner through a predetermined temperature gradient. This allows the surface and interior to cool uniformly. This controlled process for cooling glass to relieve interior stresses is called “annealing.”
For general information about annealing, see TechNote 4: Heat & Glass. To learn about annealing large-scale work, see TechNote 7: Monitoring Kiln Temperatures for Successful Annealing. You may also wish to see our Annealing Chart for Thick Slabs in Fahrenheit or Celsius.
What schedule should I use for annealing?
Since temperatures and firing schedules can vary depending on the project you’re making, there’s no perfect “one-size-fits-all” annealing schedule. You can learn basic principles for annealing in Technote 4: Heat & Glass.
Also, by scanning our various TipSheets, you can learn about annealing schedules for specific types of projects.
For larger-scale works, you’ll want to refer to our Annealing Chart for Thick Slabs in Fahrenheit or Celsius and TechNote 7: Monitoring Kiln Temperatures for Successful Annealing.
Want to gain some insight into the science of annealing as it refers specifically to Bullseye glass? Watch our presentation on Recommended Annealing Cycle for Bullseye Glass.
Do you have projects that teach about kilnforming?
Yes! We offer a variety of ways and a wealth of information to jumpstart your kilnforming adventure.
How do I know whether to use Standard 3mm glass or Thin (2mm) glass?
Consider the 6-millimeter rule: When heated to full fusing temperatures, most Bullseye sheets will naturally assume a thickness of about 6 millimeters unless constrained by dams or molds. For projects like plates and tiles, you may want to start with a base of two layers of Standard 3 mm sheet glass. A base thinner than two Standard layers, when fired, will tend to shrink or draw in to assume a 6 millimeter thickness. To learn more about this basic kilnforming principle, see TechNote 5: Volume & Bubble Control.
Given the 6-millimeter rule, you can consider when you might want to use Thin glass. Some common uses include adding design elements on top of base glass (thick design elements may dilute color in the base or distort edges) and stacking multiple layers of color within a piece.
How do I make a desktop?
Making a glass desktop can be a complex project, requiring a fair amount of experience and specialized equipment. If you’re serious about making a desktop, we recommend that you take basic kilnforming classes to learn about the tools and processes involved. Or consider collaborating on the project with an experienced kilnforming studio in your area.
Can I make my project at Bullseye studios?
Yes, once you’ve taken at least one kilnforming class at Bullseye, you’re welcome to assemble and fire projects during our Open Studio sessions.
Bullseye Studios are located inside Bullseye Resource Centers. Our studios are fully stocked with top-of-the-line equipment. If you have any questions about open studios, please give us a call!
Can I make my own stringers?
Yes, you can hand-pull your own stringers using a Vitrigraph kiln. If you have the opportunity to use a Vitrigraph kiln, we highly recommend you take it. Not only is it fun, but you will be able to make unusually shaped stringers that can be used to create interesting and unique imagery.
To read about the process and equipment needed, see TechNote 2: The Vitrigraph Kiln . Our online education program includes a lesson on the Vitrigraph kiln, and we offer demonstrations frequently in our Resource Centers.
How do I make tiles?
Simple tiles are among the easiest objects to make in fused glass. While our TipSheets don’t specifically address tile-making, we have several with enough basic information to get you started. Once you’re ready to move beyond the basics, you can reference our video Gang Dam Tile to work more efficiently.
Take a look at TipSheet 7: Platemaking Tips and TipSheet 1: Kilncarving. You can also learn a lot about basic fusing in the “Make It Projects” on our Index of Articles page and in TechNote 4: Heat & Glass.
There are also a number of technical books that talk about glass fusing fundamentals, which will give you the background knowledge to experiment on your own. To find short courses that are convenient for you, check our class schedule or look for a teaching studio near you.
How do I prepare shelves for a large kiln?
Glad you asked! Please read our detailed instructions in TechNote 6: Preparing the Shelf System for a Large Kiln.
How do I program a Paragon kiln to go as fast as possible?
Paragon kilns are great kilns for the home studio or workshop. We recommend them for their high quality and ease of use.
In order to get a Paragon kiln to heat or cool as quickly as possible, simply enter the rate 9999°F.
How do I restrain glass flow?
Restraining glass flow requires the use of kiln furniture such as side walls and dams. In Tipsheet 3: Working Deep and TipSheet 5: Bullseye Box Casting, we discuss the fundamentals of using these tools in the context of specific kilnforming methods. We also recommend watching our video lesson: “Kiln Shelves and Furniture“.
Many of our video lessons also demonstrate how to restrain glass flow in contexts related to the project or method being discussed.
What can I expect from Bullseye rods?
Bullseye rods are an accessory glass that can be added to kilnforming projects to create a variety of unique design elements.
In the production of Bullseye rods, five characteristics are evaluated:
- Compatibility: Bullseye Compatible rod styles are factory tested to the same standards as other Bullseye Compatible materials for kilnforming.
- Color: Hue, saturation and opacity are evaluated.
- Shape: Diameter, roundness and straightness/warp are evaluated.
- Clarity: Rods must fall within an acceptable range for bubbles, stones and surface qualities.
- Overall performance: Color striking and workability are evaluated.
Bullseye rods are also graded:
- T grade rods are formulated for flameworking and not recommended for kilnforming. They include Lustres, Opaques, and other styles.
- F grade rods are rated for both flameworking and kilnforming. They are part of the Bullseye Compatible product line.Both F and T grades may be combined reliably in the torch.
Both F and T grades may be combined reliably in the torch.
Kilnforming with F grade rods:
The material characteristics of F grade rods relate closely to the Bullseye sheet glass palette, with some noteworthy differences, generally driven by the rod-forming process and the nature of the form itself. Comparisons to 3mm sheet glass are drawn here.
Transparents: It’s important to consider how color saturation relates to volume and thickness of form. The diameter of a rod is greater than the thickness of standard 3mm sheet and displays more saturated color. Many styles are highly saturated and will reveal lighter coloration if used in small amounts, displaced and thinned through kilnforming methods, or ultimately coldworked to remove material. Conversely, the 001800 series has subtle coloration and much greater transparency, which is suitable for working thicker or as visual representation of negative space in thinner works. For medium color saturation, the 001500 series (currently unique to rod) has less color saturation and more transparency than its 001400 counterpart. As a general guideline, color saturation decreases as the style number increases. Striking transparent pinks and purples likely contain a linear streaked design along the length of the rod, which may also be visible if fired on end. Linear streaking is most prevalent in the following glasses: 001232, 001305, and 001311. Hue and saturation may also differ slightly when compared to sheet glass; a wider range is accepted due to changes that occur in the forming process.
Opalescents: Expect more variation in opalescent rods when compared to sheet glass, with several styles taking on both greater opacity and lighter coloration. This visible shift occurs in sulfur glasses during the forming process and remains stable through kilnforming. Similar comparisons in color and opacity could also be drawn between sheet glass and stringer. (See About Our Glass for more information about sulfur content.) When viewed on end, opalescent rods may exhibit a small dark spot—a core that runs the length of the rod. Whether it is a darker version of the rod color or transparent in nature, it generally remains stable through firings and can be used as a design element. This too, is a result of the forming process.
Helpful Resources:
Kilncasting
What is kilncasting?
Kilncasting is the process of creating a glass object in a kiln by heating glass above or inside a refractory mold until it flows to fill the void.
One of the biggest challenges in kilncasting is creating the mold. There are two types of molds that can be used in kilncasting: open-faced or closed/semi-closed. When using an open-faced mold, your finished piece will be a reverse-relief, bas-relief pâte de verre, thick-block, or box castings. When using closed or semi-closed molds, you will be able to make full sculptural pieces.
How do I learn to kilncast glass?
Many people are most successful when they start by taking a class. To find a short course that’s convenient for you, check our classes or search for a teaching studio near you.
Depending on the type of kilncasting you want to do, you might find the help you need in TipSheet 5: Bullseye Box Casting or TipSheet 8: Basic Lost Wax Kilncasting.
Do you have projects that teach about kilncasting?
You can get some ideas and basic information from the following articles and video lessons.
Articles (FREE)
Video lessons (subscription required unless otherwise noted)
Can I cast glass in Bullseye slumping molds?
Yes. Remember to re-apply shelf primer after each firing, and review our Tips for Using Bullseye Slumping Molds.
Can I make a reusable kilncasting mold?
Yes, if you use the appropriate investment mix. The commercially available product Castalot is one example of a good reusable mix for glass slumping, fusing or kilncasting.
Do I have to dry my casting mold in the kiln?
Yes, it is important to remove as much moisture as possible from your casting mold. To learn more, read the “Firing the Mold and Glass” section in TipSheet 8: Lost Wax Kilncasting.
Can I firepolish my casting?
Firepolishing is the process of heating a glass object in a kiln to a temperature high enough to impart some level of gloss to the surface.
If your piece is flat, rather than upright, you may be able to firepolish it. Since firepolishing is accomplished in the slumping temperature ranges, it should not be attempted on more upright pieces.
Can I cast glass together with clay?
Normally, ceramic clay and glass are not compatible materials. Theoretically, however, it may be possible to devise a clay that is compatible with Bullseye glass. At this time we don’t know of anyone who has achieved such a clay. There are ceramicists who incorporate glass in their work experimentally to create special effects, such as crackled glass pools in vessel bottoms.
Do glass colors change in kilncasting?
Color can change depending on a variety of factors. (For example, the thickness of the glass and the amount of time spent at casting temperatures). Some Bullseye glasses, mainly the 001100 series and 001400 series, are so saturated that they will appear black at certain thicknesses.
Other colors, particularly transparents that rely on cadmium, selenium, and/or sulfur, are slightly more sensitive to heatwork. If exposed to excessive heatwork, they may shift from transparent to opalescent.
The form of glass used can also affect color. A casting made of billet will have excellent clarity, while casting with the same color in frit will result in a piece with a milky appearance.
To read about selecting glass for casting, see TipSheet 8: Basic Lost Wax Kilncasting.
How do I make pâte de verre?
Pâte de verre is a kilncasting method that literally means “paste of glass”. The general premise is to mix frit granules with some sort of binder such as gum arabic, then apply the glass to the inner surface of a negative mold.
Pâte de verre is the method used in our video lesson: Day of the Dead Skulls. Our video shows you a common way to make pate de verre and a fun project to go along with it.
We highly recommend taking a class to learn about pate de verre, and the tools and processes behind this particular casting method. Consider Alicia Lomné’s Master Class Video and those at local teaching studios to find a course that’s convenient for you.
How can I cast to get some gloss on the finished surface?
The interior texture of the mold will affect the final texture and amount of gloss on your piece. Using an investment mix or mold material with a fine grain will reduce the amount of texture and increase the degree of gloss.
There are also ways to add gloss to a piece that has already been cast. The best method for doing this will depend on the exact nature of the piece.
You could firepolish the piece, which involves returning it to the kiln. Bear in mind that firepolishing happens at slumping temperatures, so it’s not recommended for pieces that will easily deform in this temperature range.
How do I prevent sharp edges in castings?
Often, sharp edges are a result of the glass scraping down the side of the mold during firing. To minimize sharp spots, set up your glass and mold up so that as the glass softens, it flows out to meet the walls of the mold, rather than scraping down them and getting hung up.
How do I prevent suckers?
In kilncasting, “suckers” are unsightly depressions or wrinkles that can pop up during the cooling process. Suckers get their name because they appear to have been sucked infrom the form of the mold.
Suckers are the result of differences in temperature during the cooling process. Often, these differences in temperature are caused by differences of thickness in a piece. Thinner or narrower areas will change temperature more quickly than thicker or wider parts. These differences can cause the glass to contract, resulting in suckers.
You can prevent stuckers by keeping your glass at a uniform temperature during the cooling process. We recommend soaking/holding the glass at 1250 F during the rapid cooling stage to thoroughly unify the temperature, then cooling gradually to the anneal soak phase.
We also recommend incorporating a large reservoir into the casting, which will remain full enough to be the thickest part of the casting, and therefore the last area to cool off.
For more information on suckers and how to prevent them, see TechNote 4: Heat & Glass and TipSheet 8: Basic Lost Wax Kilncasting.
How large can my casting be?
Your casting can be as large as your kiln will allow. As a rule of thumb, the interior of the kiln should be at least twice the height of the final casting or more, depending on your setup.
For large castings, one of the most important considerations will be heating and cooling the casting uniformly. Differences in temperature throughout the piece can result in a number of different problems, suck as thermal shock or suckers.
For examples of how to approach a large casting, see figures 9 and 10 in TipSheet 8: Basic Lost Wax Kilncasting.
My casting cracked. How can I fix it?
That depends entirely on the piece and the crack. Some cracks can be fixed relatively easily, while for others it might not be worth it.
If it’s a large crack or one that’s is in the interior of the piece, you’ll probably need to recast. There’s nothing you can do to get rid of interior cracks once the piece is cast, but you can try to determine what caused the cracking and improve your process for the next project.
Was the piece cooled too rapidly and thermal shocked? Did it stick to the mold material? These are two common causes of cracking.
If the crack in your piece is not on the interior and if gluing seems appropriate and possible, you might try using a two-part epoxy adhesive.
My casting cracked. Can I put it back in the mold and refire?
Theoretically, in certain cases it is possible to reinvest the cracked piece and recast it. But if the mold was damaged while removing the cracked piece, you will need to make a new mold.
And while a damaged piece can be repaired, the amount of time and effort required to do so, combined with the likelihood that the repair may be unsuccessful or the piece may crack again, we suggest a different approach.
Think about what factors may have contributed to the casting in the first place, think about possible ways to avoid those factors in the next casting, and try again.
What are the advantages of casting with Bullseye?
There are numerous advantages to choosing Bullseye glass for kilncasting. A few of these include:
- Choose Bullseye if you’re concerned about the safety issues associated with lead crystal.
- Bullseye is significantly lighter than lead crystal and may be more economical to use. (Full lead crystal glasses weigh as much as 45% more. The specific gravity of Bullseye is about 2.5.)
- Our billets, sheet glass, rod, frit, and powder can be combined to achieve highly individual results in casting.
- Bullseye’s color selection is unsurpassed.
What equipment do I need for kilncasting?
At the very least, you’ll need a kiln, kiln furniture, and a suitable work surface.
The rest depends entirely on the scale and type of casting you plan to do. Two of the most popular kilncasting processes are box casting and lost wax kilncasting. Each of these methods will require different tools and their own unique set of considerations.
In order to properly answer this question, we suggest reading about these different methods and deciding which is most appropriate for the project you’re considering. Then, once you’ve decided, it will be clearer which equipment will be needed.
What firing schedule do I use for casting?
As with nearly all kilnforming projects, the answer will vary depending on a number of factors such as the mold you’re using, the process you’re using, as well as the glass you’re using.
For example, a pâte de verre firing schedule would differ greatly from a box casting firing schedule.
We can try to help you find the perfect firing schedule for your project by recommending some different firing schedules that have been successfully tested with various processes in our lab.
If you’re using the lost wax method, see TipSheet 8: Basic Lost Wax Kilncasting. If you’re doing a box casting, see TipSheet 5: Bullseye Box Casting.
Many beginning kilncasters get started by taking short classes or workshops, either at Bullseye or at local teaching studios.
What form of glass do I use for kilncasting?
Different casting methods and desired outcomes will necessitate different forms of glass. For example, if working in the pate de verre method you will want to use frits and powders. Whereas when working in the box casting method, for example, you may find it easier to work with billet.
Any form of Bullseye glass (billet, cullet, sheet, frit) may be used, but the form selected will have a direct impact on the clarity of the casting. For example, a casting made from billet will have excellent clarity, while casting with the same color in frit will result in a piece with many small bubbles and a milky appearance.
To read more about selecting glass for kilncasting, see TipSheet 8: Basic Lost Wax Kilncasting.
What is investment?
Investment is a mixture of materials used to make a mold. In general, investment mixes for kilncasting glass are composed of three basic ingredients: a binder, a refractory, and modifiers.
Some artists use readymade investment mixes like Bullseye Investment, which is plaster-silica based.
To learn about creating your own investment recipes, see TipSheet 8: Basic Lost Wax Kilncasting.
What kiln should I use for casting?
Almost any kiln that will fit your mold setup will work. The most important thing to consider when selecting a kiln for casting work is whether there will be plenty of room around the mold to allow for uniform heating and cooling.
In addition to space for air to circulate, heating elements in the floor, lid, and on all sides will go a long way to facilitating uniform heating and cooling.
What molds are used for kilncasting?
Molds for kilncasting fall into two broad categories: open-faced or closed/semi-closed.
In open-faced molds, one side of the mold is completely open; the cold glass is placed directly into the mold through that opening. Using open-faced molds, you can create reverse-relief, bas-relief, pâte de verre, thick-block, and box castings.
You can use Bullseye slumping molds for open-faced kilncasting.
In molds that are closed/semi-closed, the mold is open only wide enough to allow the glass to flow in from the outside, often through a reservoir. Using closed/semi-closed molds, you can make fully sculptural pieces.
What types of kilncasting can I do?
Kilncasting projects generally fall into one of two broad categories: those which are made in open-faced molds, and those that are made in closed or semi-closed molds.
In open-faced molds, one side of the mold is left completely open. The cold glass is placed directly into the mold through that opening. Using open-faced molds, you can create reverse-relief, bas-relief, pâte de verre, thick-block, and box castings.
In molds that are closed or semi-closed, the mold is open only wide enough to allow the glass to flow in from the outside, often through a reservoir. Using closed/semi-closed molds, you can make fully sculptural pieces.
What’s the difference between kilncasting and a hot pour?
Kilncasting involves casting glass into a mold that’s in a kiln. A hot pour involves ladling molten glass from a furnace and pouring it into a mold that may or may not be in a kiln.
What’s the difference between kilncasting and lost wax kilncasting?
Lost wax kilncasting is just one of many kilncasting methods. To learn more about this method, see TipSheet 8: Basic Lost Wax Kilncasting or our Video lesson: Lost Wax Kilncasting.
Customer Service & Sales
Where can I get answers to frequently asked customer service and sales questions?
For frequently asked customer service and/or sales questions, please visit the Customer Service/Sales FAQ section in our online store. If you don’t see the answer to your question there, please give our sales department a call at 503.232.8887, Mon-Fri, 7am–5pm (Pacific Time) or email us at sales@bullseyeglass.com.
Can I get samples of your glass?
Yes. Our popular sample sets for sheet glass, and billets are great resources for any studio. Note that these samples are for color reference only. They are not intended for reheating and may not be fusible.
Can I buy online and pick up in store?
Bullseye offers customers a great alternative to buying online and picking up in store.
You can create and submit a QUOTE through our Online Store that we then will prepare for pick up at your nearby Bullseye Glass Resource Center.
To learn more about this option, check out our page describing how to order in advance for in-store pickup.
How do I submit a QUOTE?
Submitting a quote is easy!
When you’re registered with our Online Store and logged in there, every product page includes an ADD TO QUOTE button. To learn more about using this feature, check out our page on how to order in advance for in-store pickup
Coldworking
What is coldworking?
Coldworking, as it sounds, is changing the shape or surface texture of glass using tools and processes that do not rely on heat. Coldworking methods include grinding, carving, engraving, polishing, sandblasting, and other techniques.
How do I coldwork my kilncast piece?
What kind of piece is it, and what are you trying to accomplish in coldworking it?
If the piece includes a reservoir that needs to be removed, this can be taken off with a wet tile saw with a diamond blade, or it can be ground off using rotary tools or by hand lapping with loose grit.
If you want to remove flashing on the surface of the casting—areas where the glass has flowed into a crack in the mold—diamond grinding points can be used to quickly remove these from the surface before polishing.
Keep in mind that the casting should be at room temperature for at least 24 hours before any coldworking is attempted!! This is because a casting that feels cool on the exterior may be considerably warmer on the interior, and still subject to possible thermal shock. If it is subjected to cold water, the exterior will try to contract around the interior, which will not be able to yield, and the piece may crack.
As always, we recommend taking a coldworking workshop to familiarize yourself with the possibilities. Check our class schedule and local teaching studios to find a course that’s convenient for you. Additionally, if you have questions about coldworking Bullseye glass, you can post them to the Bullseye Glass Community on Facebook.
Can I sandblast glass to remove devit?
Yes. And it is a good idea to fully remove devitrification, either by sandblasting and/or grinding, as soon as you notice it to stave off further growth.
After you have sandblasted away the devitrification, clean the glass with compressed air, load it onto a prepared kiln shelf, and fire it to the appropriate temperature to achieve the finish you want.
Besides sandblasting, how can I remove devit?
If your glass is flat, you can sift a very thin layer of Clear powder (about 2 grains thick) over the entire piece and fire it to 1425°F (774°C) – 1450°F (788°C) for about ten minutes, depending on your kiln. This should remove the visible presence of devitrification. Please note: This method only works if you don’t intend to fire the piece again, as refiring could restart the crystallization.
For more details on this process, see Quick Tip: Use Bullseye Clear Powder to Fix Surface Flaws.
How do I get rid of sharp edges on my project?
There are many ways to remove sharp edges from your project. You will need to assess your project and the type of edges you’re dealing with, and decide which tools and processes are best.
Tools may include anything from simple hand tools like a Sickle Stone or Diamond Hand Lap to more complex mechanical grinders and coldworking equipment.
We have produced a range of videos that demonstrate how these tools may be used, but we always recommend taking a class or workshop in your area first to familiarize yourself with the tools and processes before attempting anything at home. Links to the video lessons may be found at the bottom of this page.
If you’re having a specific problem with sharp edges on a piece you’ve made with Bullseye glass, you can post a question on the Bullseye Glass Community on Facebook or contact our sales team (Monday-Friday, 7-5 PST; 503.232.8887; or send us an email).
What coldworking equipment do I need?
In short, you need the equipment that’s right for the type of work you’re making and the results you want to achieve. We recommend taking a class to learn about the different types of coldworking equipment and supplies that are available, and also to try out various kinds of equipment before investing in expensive tools. Check our class schedule and list of local teaching studios to find a course that’s convenient for you. We also have several videos that cover aspects of coldworking.
If you haven’t found the answer you’re looking, consider posting your question to the Bullseye Glass Community on Facebook. Join us today!